
Experiencing a flat tire can be a frustrating and inconvenient experience. While some punctures can be easily repaired with a tire plug or patch, a leaking tire bead requires a different approach. In situations like these, a break in the seal between the tire bead and the rim causes air to escape, leading to a gradual loss of tire pressure. If left unchecked, it can result in tire failure, which is both dangerous and unpredictable. This comprehensive guide will equip you with the knowledge and steps necessary to fix a leaking tire bead effectively.
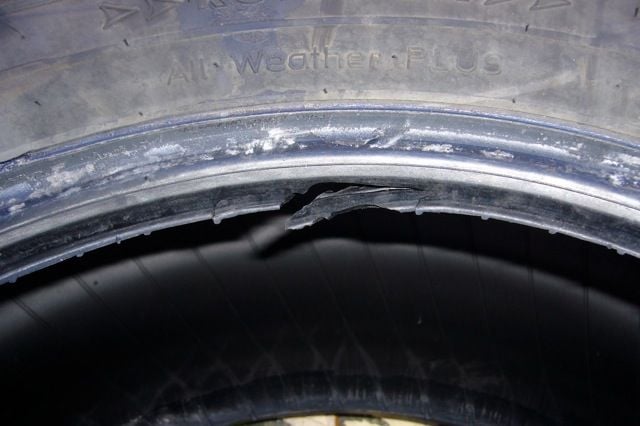
Image: www.utires.com
Understanding Tire Bead Leaks
The tire bead is the section of the tire that comes into contact with the rim. This seal keeps air from escaping and maintains proper tire pressure. Tire bead leaks result from damages that compromise this seal, such as:
- Improper tire mounting: Incorrectly mounting a tire can cause the bead to not seal against the rim correctly.
- Rim damage: Dents, bends, or corrosion on the rim can obstruct the bead’s ability to form a tight seal.
- Tire damage: Sidewall cuts, punctures, or bulges can weaken the tire, preventing it from maintaining a proper seal with the rim.
- Off-road driving: Rough terrain can cause the bead to slip on the rim, leading to a leak.
Tools and Materials Required
Before embarking on this task, ensure you have the following tools and materials:
- Tire gauge or pressure gauge
- White chalk or tire marking crayon
- Soapy water solution (mix a few drops of dish soap in a spray bottle filled with water)
- Tire sealant or rubber cement (optional)
- Tire pump or air compressor
- Lug wrench
- Jack stands
Step-by-Step Guide to Fix a Leaking Tire Bead
Step 1: Safety First
- Park the vehicle on a flat, stable surface.
- Engage the parking brake to prevent the vehicle from moving accidentally.
- Place wheel chocks behind the tires opposite the flat tire to prevent the vehicle from rolling if the jack fails.
Step 2: Identify the Leak
- Use the tire gauge to measure the tire pressure and identify the flat tire.
- Spray the soapy water solution around the bead area of the flat tire.
- Look for bubbles forming along the bead, indicating the leak’s location. Mark the exact spot with white chalk.
Step 3: Deflate the Tire
- Use the lug wrench to loosen the lug nuts on the flat tire but do not remove them completely.
- Position the jack near the flat tire and raise the vehicle until the flat tire is about 6 inches off the ground.
- Remove the lug nuts and gently pull the flat tire towards you to detach it from the rim.
Step 4: Inspect the Rim and Tire
- Thoroughly inspect the rim for any dents, bends, or corrosion.
- Check the tire for any cuts, punctures, or bulges.
Step 5: Clean the Bead and Rim
- Use a clean cloth to wipe away any dirt or debris from the bead area of the tire and the corresponding area on the rim.
- If the rim is corroded, use a wire brush to remove the rust.
Step 6: Apply Tire Sealant (Optional)
- Apply a thin layer of tire sealant or rubber cement to the bead area of the tire.
- Allow it to dry for a few minutes according to the manufacturer’s instructions.
Step 7: Remount the Tire
- Align the tire with the rim and carefully lift it onto the rim.
- Push the tire bead firmly into the rim channel, starting at the marked leak location.
- Continue pushing the tire bead around the entire circumference of the rim until it is fully seated.
Step 8: Inflate the Tire
- Use a tire pump or air compressor to inflate the tire to the manufacturer’s recommended pressure.
- While inflating, keep an eye on the bead area to ensure it is sealing correctly.
Step 9: Tighten the Lug Nuts
- Hand-tighten the lug nuts onto the wheel bolts.
- Using the lug wrench, tighten the lug nuts further, following the manufacturer’s torque specifications.
- Lower the vehicle to the ground and remove the jack stands.
Step 10: Recheck the Seal
- Spray the soapy water solution around the bead area again to check for any remaining leaks.
- If bubbles appear, repeat the process from Step 5 onwards.

Image: boostatv.com
Tips for Preventing Tire Bead Leaks
- Ensure proper tire mounting by a qualified professional.
- Regularly check the tire pressure and maintain it within the specified range.
- Avoid hitting curbs or potholes, especially at high speeds.
- If you encounter rim damage, have it repaired promptly to prevent tire bead leaks.
- Store tires in a dry, cool place when not in use.
How To Fix A Leaking Tire Bead
Conclusion
Fixing a leaking tire bead can be a straightforward task with the right approach and knowledge. Following the steps outlined in this guide will help you effectively repair the leak and restore your tire to optimal performance. Remember, timely repairs and proper maintenance are essential to ensure the longevity and safety of your tires.


